Mini Mochila Bag Easy


Some time ago I made the mini mochila bag, this is a pattern for advanced crocheters. Someone asked for an easier pattern with this tapestry technique, so I designed a small mochila like bag that is easier to copy. You can make the bottom of the bag the same as I do, but you can also experiment with your own pattern. You can also make the bag larger, but keep in mind the number of stitches needed for the side. Above all, it is a very fun pattern to make and I hope it will also be easy for beginners to follow. And if you’ve made this bag, you might want to try making the more difficult one too.
Materials
- 50 grams of cotton yarn or a bamboo cotton blend in the color cream. (I used UGA, a number 2 bamboo yarn, 70% bamboo fiber and 30% cotton)
- 50 grams of cotton yarn or a bamboo cotton blend in a contrasting color. I used https://www.iceyarns.com/yarn/q.18#ajaxitem/peperoncino-cream-blue
- 2.5 mm. C hook
- 3 stitch markers
- a pair of scissors
- a tapestry needle
Terms used/abbreviations
ch chain
sl st slip stitch
sc single crochet
yo yarn over
yu yarn under
Notes
- This pattern is written in US terms.
- The bag is crocheted from bottom to top.
- You don’t finish your rounds, you just keep going in a spiral.
- For this project you work in the back loops only and you make a single crochet with first a yarn over and finish the stitch with a yarn under.
- When you change color you do this in the middle of the sc. When you have 2 loops of color A on your hook, do the last yarn under in color B and draw through all of the loops on the hook to finish the sc in the new color.
- Work over the color you don’t use every time you make a stitch.
Pattern
Bottom
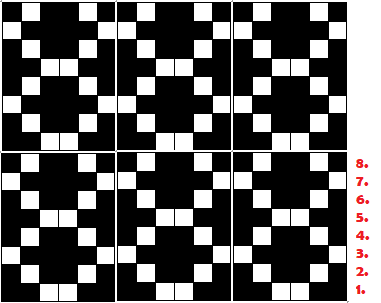
Start with the multicolor yarn and make a slip knot on your hook. Ch 20. You can follow the chart below and make a white stitch where the red dots are or you can create your own pattern by only following the steps below and change color whenever you like. If you follow the chart below you can work up the pattern after round 6 but you know exactly where to place the white stitches by then.

Round 1: Insert the hook in the 2nd chain from the hook and make a sc (always yo and yu), sc in the next 18 stitches, 3 sc in the last stitch. Put a stitch marker in the first of these 3, 18 sc in the next 18 stitches, 3 sc in the last stitch. Also put a stitch marker in the first of these 3.
Round 2: make sc across until you reached the stitch with the stitch marker (you can follow the chart in the same time or make your own pattern). This stitch and the 2 after this gets 2 sc each, put the stitch marker in the first of these 6 stitches, sc in every stitch across until the other stitch marker, this stitch and the 2 after this gets 2 sc each, put the stitch marker in the first of these 6 stitches.
Round 3: Make sc across until you reached the stitch with the stitch marker. *This stitch gets 2 sc, put the stitch marker in the first of these 2 stitches, sc in the next stitch, 2 sc in the next, sc in the next, 2 sc in the next, sc in the next*. You now are around the corner, sc in every stitch across until the other stitch marker, repeat between the * on this corner.
Round 4: Make sc across until you reached the stitch with the stitch marker. *This stitch gets a sc, put the stitch marker in this stitch, 1 sc in the next stitch, 2 sc in the next stitch, 1 sc in the next 2 stitches, 2 sc in the next, 1 sc in the next 2 stitches, 2 sc in the next*. You now are around the corner, sc in every stitch across until the other stitch marker, repeat between the * on this corner.
Round 5: Make sc across until you reached the stitch with the stitch marker. *This stitch gets 2 sc each, put the stitch marker in the first of these 2 stitches, sc in the next 3 stitches, 2 sc in the next, sc in the next 3 stitches, 2 sc in the next, sc in the next 3 stitches*. You now are around the corner, sc in every stitch across until the other stitch marker, repeat between the * on this corner.
Round 6: Make sc across until you reached the stitch with the stitch marker. *This stitch gets a sc, put the stitch marker in this stitch, sc in the next 2 stitches, 2 sc in the next stitch, 4 sc in the next 4 stitches, 2 sc in the next, 4 sc in the next 4 stitches, 2 sc in the next, 1 sc in the next*. You now are around the corner, sc in every stitch across until the other stitch marker, repeat between the * on this corner.
Round 7: Make sc across until you reached the stitch with the stitch marker. *This stitch gets a sc, put the stitch marker in this stitch, sc in the next stitch, 2 sc in the next stitch, 5 sc in the next 5 stitches, 2 sc in the next, 5 sc in the next 5 stitches, 2 sc in the next, 4 sc in the next 4*. You now are around the corner, sc in every stitch across until the other stitch marker, repeat between the * on this corner.
Round 8: Make sc across until you reached the stitch with the stitch marker. *This stitch gets a 2 sc, put the stitch marker in this stitch, sc in the next 6 stitches, 2 sc in the next stitch, 6 sc in the next 6 stitches, 2 sc in the next, 6 sc in the next 6 stitches. You now are around the corner, sc in every stitch across until the other stitch marker, repeat between the * on this corner.
Round 9: Make sc across until you reached the stitch with the stitch marker. *This stitch gets a sc, put the stitch marker in this stitch, sc in the next 2 stitches, 2 sc in the next stitch, 7 sc in the next 7 stitches, 2 sc in the next, 7 sc in the next 7 stitches, 2 sc in the next, 4 sc in the next 4 stitches*. You now are around the corner, sc in every stitch across until the other stitch marker, repeat between the * on this corner.
Round 10: Make sc across until you reached the stitch with the stitch marker. *This stitch gets a sc, put the stitch marker in this stitch, sc in the next 5 stitches, 2 sc in the next stitch, 8 sc in the next 8 stitches, 2 sc in the next, 8 sc in the next 8 stitches, 2 sc in the next, 2 sc in the next 2 sc*. You now are around the corner, sc in every stitch across until the other stitch marker, repeat between the * on this corner.
Round 11: Make sc across until you reached the stitch with the stitch marker. *This stitch gets a sc, put the stitch marker in this stitch, 2 sc in the next stitch, 9 sc in the next 9 stitches, 2 sc in the next, 9 sc in the next 9 stitches, 2 sc in the next, 9 sc in the next 9 stitches*. You now are around the corner, sc in every stitch across until the other stitch marker, repeat between the * on this corner.
Your bottom is now done and it has 102 stitches. If you make your bottom bigger then keep in mind that the number of stitches for the sides needs to be divisible by 6.
Start the side with a round of sc in the multicolor. Keep using the back loops only and the yarn over and yarn under.
Repeat the chart below for the side of the bag as long as you need to make your way around the bag and for half an inch under the height you want. I repeated this chart 4 times to get my height.
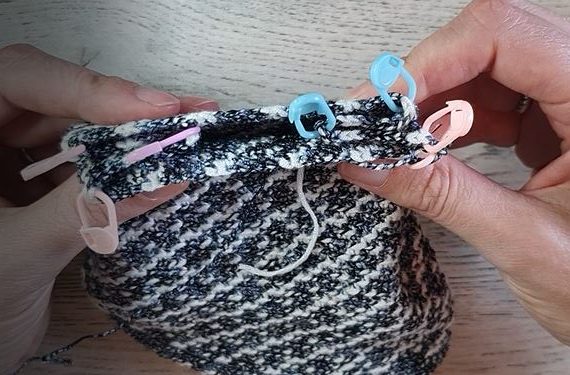
Now we start with making the holes for the cord. Lay your bag flat on the table and put a stitch marker in every corner, then push the stitch marker in like you see in the middle on the photo and put stitch markers in the two corners. Repeat on the other side.

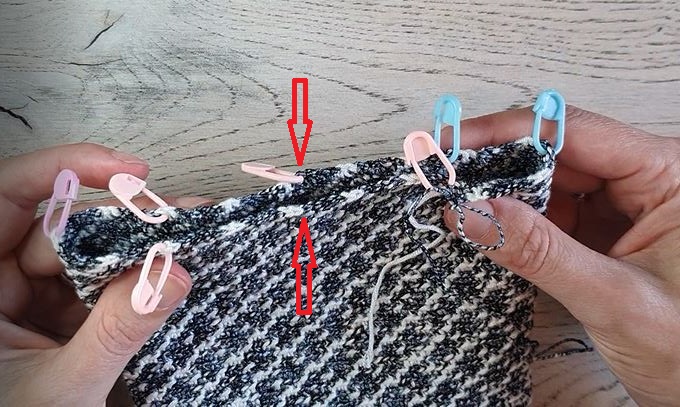
The last step is to put two stitch markers in the middle of the front and the back. See the red arrows in the photo.
Now we make a round of sc in the back loops only and exactly in the middle of two stitch markers you make a ch 2 and skip the middle two stitches. Then continue with sc. At the end of the round you have 8 holes evenly spread around the bag. You can take out the stitch markers, except for the stitch marker that marks the start of your round. You leave this one so you know where your round starts.
Make 3 more rounds of sc. To cover the chains you make in every chain 2 sc. Bind off and weave in your ends.
It’s time to make the strap.
Row 1: Ch 6, make a sc in the 2nd loop from the hook and in every stitch across. You now have 5 stitches.
Row 2: Ch 1 turn your work, sc in every stitch across. Repeat row 2 until the strap has the length you want. Mine is almost 32” or 80 cm. Attach the 2 ends of the strap to the bag with sc.
Cut 6 strands of multicolor yarn of 150 cm. or about 5 feet. Twist them together until they begin to resist, fold them in half and they will continue to twist. Tie a knot in both ends. Thread the cord up and down through the holes in the bag.
Finish off and weave in your ends.
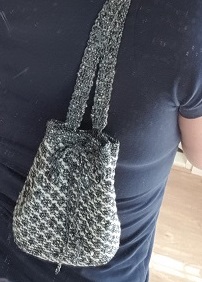
And we’re done. Enjoy making this fun bag and have fun using it!


You can also find me on: